
DIY Accent Wall
- Michelle Foley

- Dec 13, 2018
- 4 min read
If you follow my Instagram account you probably saw (and I say probably, but really what I mean is you must have seen it because I only have 5 posts right now) my post on the before and afters of our current bedroom. But if you don't, please follow my account which is "Rockvillecentrebuild"! Here is a picture of our current bedroom now....

But let me tell you, it didn't always look this nice. When I moved in with my husband, the house needed some serious TLC. That't not to say he didn't do a great job on the rebuild after it was gut renovated, but there were just so many things that were done in a rush. I basically came in at the most fun point, which is obviously decorating. At the point I came in the house was like a beautiful clean slate. Although not everything was my taste, it was easy enough to finish and decorate to make the house our home. Anyways our bedroom was where I started, and for good reason. It was this horrible green color, he was using door mats as area rugs, and he had a bedroom set straight out of the 80's. See for yourself ...
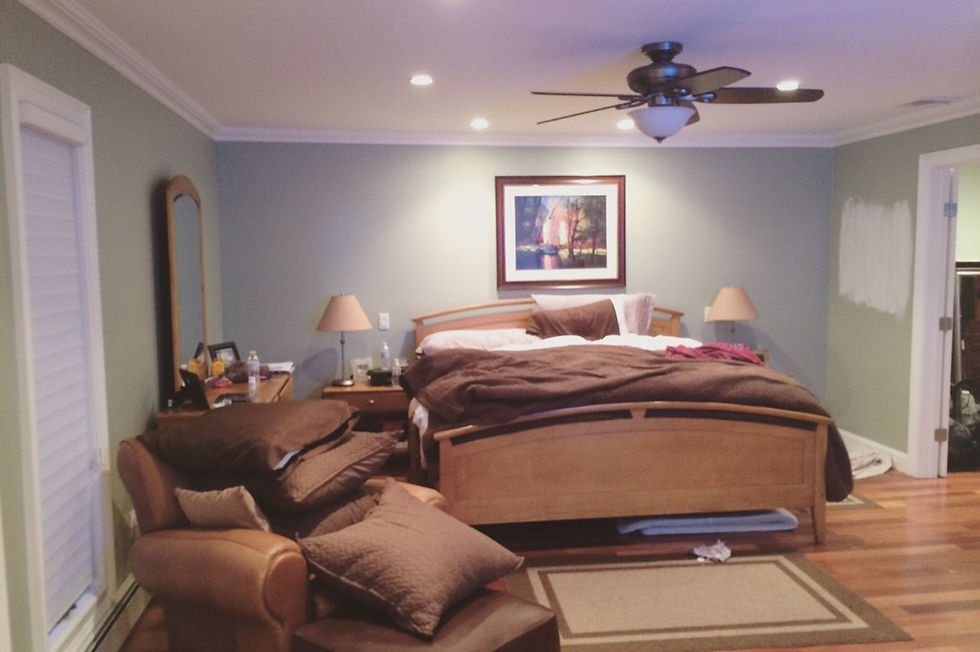
Most men who see this are probably thinking, what's wrong with the before? In fact one of my best friends husband made that exact comment... And most women who see this are probably thinking, 'My god....' In all honesty it wasn't actually that bad, until I had to look at it all day, everyday.
The whole room was obviously a bigger project than just painting, but the change of wall color and accent wall did make a significant difference and was the first thing we did before we decided on furniture. After that we did Pottery Barn out our life, but for the sake of this post I'm just going to talk about the paint change and accent wall. After extensive searching we chose Benjamin Moore's 'Pale Oak'. It is still one of my favorites and a color I plan to use again in our new house. I also knew I wanted to do some sort of accent wall. And because my husband is very handy with a chop saw and nail gun, we were able to do the whole thing ourselves. Here's another picture to help get a feel for the overall look...

If you have, or can borrow, the equipment from others, what you need is actually very minimal. Mostly it's just your time that you need to invest.
Equipment List:
Chop Saw
Nail Gun
Tape Measure
Caulking Gun
Level
Materials List:
2" wall molding (specific amount depending on the size of the wall and the number of boxes you wish to do)
Brad nails (small thin nails used in nail gun)
Caulking
Wood glue
Paint and painting supplies- we used a true white in a semi gloss finish
First and foremost you have to decide how many boxes you want to put on your wall. Depending on what you're framing will determine how many you should do. In our bedroom we were looking to frame our bed and we had such a big wall that we decided to do two more, one on either side of the main box. We also liked the look of smaller boxes on top so we decided to do 6 over all.
From there you should measure your wall and determine where to start and end each box. Once you do that you should mark on your wall where they will start and end, and then grab a level and make sure that your boxes are going to be straight! Draw your line in pencil to make sure you keep it level when mounting.
Then comes the cutting. You want to work on one box at a time, making sure the angles are accurate and the pieces will fit together correctly before you mount anything on the wall. You want to cut the ends at a 45 degree angle, so that when you put them together they make a 90 degree angle at each corner. Once you know you have cut the two joining pieces correctly and that they will fit together, it's time to mount them.
My husband suggests using a little bit of wood glue, and of course having help to hold the pieces on the wall straight. From there you want to nail in each corner, starting at the seams, and add a few more nails into the middle of the board. Do this, one piece at a time, until you form a perfect box. Continue these steps for the remaining boxes, and just make sure you have help with the mounting.
After all the boxes are mounted you will want to get out the caulking gun and caulk the edges of each box so that when you paint it there won't be any gaps between the wood and the wall. This will help the boxes to look like they're "built into" the wall. A tip for caulking; have a wet paper towel with you so that you can run it over the caulked seam to smooth the finish.
Once the boxes are up, caulked, and dry after caulking, you will want to paint. You're going to paint the whole wall as you would usually do with a roller, and use a regular paint brush only on the mounted boxes. Make sure you keep it as smooth as possible. We used a White Semi-Gloss for our boxes in our bedroom. But we also did an accent wall in our living room and used a satin brown paint as well. It really doesn't matter and just depends on the look you want.

No matter the space, these accent walls really do add a lot of character to any room and although they can be time consuming, they are a pleasure to look at everyday!


Comments